...in my hot little hands. The iPhone that is. I'm in love. This is my first cool phone ever! So super thrilled. I'm having so much fun customizing it. Off to play around with it some more.
Thanks for stopping by:
Yar!tza
Wednesday, March 30, 2011
Tuesday, March 29, 2011
I'm getting......
..an iPhone, yea, yea, yea!. It will be here tomorrow. So super thrilled! I have wanted one since they first came out and I had to wait for my current contract to expire. It finally did. That was the longest year ever!
Thanks for stopping by
Yar!tza
Thanks for stopping by
Yar!tza
Tuesday, March 22, 2011
What I'm doing this week...
...cleaning. That's all. Between my daughter getting the flu, my son and I with strep throat the house was a disaster. We have family coming this weekend and I really want to make sure the house looks nice so all my energy and efforts will be put to cleaning and organizing my home. Hopefully this weekend can get some scrapping done.
Thanks for stopping by:
Yar!tza
Thanks for stopping by:
Yar!tza
Thursday, March 17, 2011
I've been sick sick sick
I am now finally starting to feel better. I got strep and this head cold thing all at the same time. It was awful. There may not be that many projects this week. I have to clean the house and do laundry. YUK!
Thanks for stopping by
Yar!tza
Thanks for stopping by
Yar!tza
Sunday, March 13, 2011
Card Gift Box
Hello everyone,
I find myself struggling to come up with gift when I need them. So I decided that I'm going to start making a few at a time to keep on hand for when I need them.
Here is my finished project:

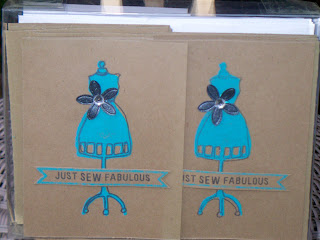
In the video I will show you how I created the cards and walk you though the completed gift box.
Supplies:
Claudine Hellmuth: Creative Layers Domestic stamp set
Sizzix: Bigz Pro shot Box and Lid die set
Papertrey Ink: Double-Ended Banner die & Banner Builder Stamp
Hero Arts: Sew Stylish Stamp
Unity Stamp Co: Material Girl Stamp
Stamping Bella: Sew What's new?
Clearsnap: Colorbox Fluid Chalk Inkpad Charcoal
Anita's Craft Ink: Island Green
Prima: Lace
Marta Stewart: Scoring board & Cornice Edge Punch
Michaels: Studio 18 Gems, Misc. Feather & Recollections Kraft Cardstock
Brides Confetti: Silver Flower table Confetti
Provo Craft: Terrifically Tacky Tape Sheets
Scor Pal: Scor Tape 1/4 inch wide
3M: Pink ATG
Tattered Angels: Dazzling Diamonds
Grafix: 12x12 .007 plastic sheets
Joanns.com: A2 Envelopes
Thanks for stopping by:
Yar!tza
Wednesday, March 9, 2011
Card to share
I've had this idea in my head for such a long time. I was obsessed with it when I saw all these stamps and cricut cartridge. Saved my pennies and I was able to get all the supplies together to make this one card. Yes one card!! I had to make this one card!
Here is the inside of it: I had to color in the image and then figure out the dimensions of the card based on the final size of the image. Honestly I don't even remember what the final dimension of the card is. I though I had it all figured out and then I had to start over cause I was an inch off. A whole inch. Math has never been my strong subject.

Breakdown and supplies:
Fist I stamped C.C.Designs Sweet November Lilliane stamp with Memento Dew Drop Tuxedo Black ink. Covered her with a stamped mask made out of Inkadinkado's stamping mask paper. Used my Stamp-a-ma-jig to help me line up Magnolia's Castle background stamp. Colored the whole scenery with my Copics and highlighted certain areas with my atyou spica pens all of that done on Cryogen white cardstock. I distressed the edges with Pumice Stone and Vintage Paper distress ink. Cut panels out of Graphic 45 Steampunk Debutante 8x8 paper pad to cover the flaps on both sides. On each panel I took the biggest rose and covered it with Rock Candy Distress Stickles.
Here is the front:

Breakdown and supplies:
I cut two panels out of the B side of the same patterned paper I used for the inside of the card. Used my Cricut Expression and the Ornamental Iron cartridge to cut the two gates out of DCWV The Metallic Stack. I used May Arts 1 1/2 inch silk ribbon which I cut in half and then colored with my Copics to match. I attached the ribbon with 1/4 inch Scor tape to the card base all the way around so the ribbon would not fall off when opened. On the corner I die cut two small gears using Tim Holtz's Sizzix Bigz die Gadget Gears with black mat board and some left overs of the patterned paper, sprayed with Dazzling Diamonds Glimmer mist. Some Recollection's Mini Roses that were toned with Copics to match and sprayed with Dazzling Diamond Glimmer Mist, two white Prima leaves sprayed with Olive Vine Glimmer Mist and some Recollections bling finish off the card.
Copic colors:
B21
BG13, BG15, BG18
C00
E000, E00, E11, E25, E27, E95, E97, E99
G94, G99
T1, T3, T5, T7
R2O
YR05, YR07, YR09
Colorless Blender
atyou spica:
Orange
Turquoise
Silver
Multilner .05
That's it for today. Thanks for stopping by :
Yar!tza
Tuesday, March 8, 2011
Bookmarks

I made these a few weeks back to take to my daughter's class mates on her birthday. Her school is a no food school but the teacher likes for the parents to come to the class and read the class a book (even though I didn't get to read the book, Isabella read it all by herself) I still wanted to have a little something for the kids.
Breakdown and supplies:
This is a great project to use up all those scraps you have laying around.
You'll need some sort of hear laminating machine. I used my Provo Craft Yourstory with Scotch's Thermal Laminating Purches for Business I.D. Cards.
For the boys I used Recollection's Kraft cardstock, a frame stamp from SU!'s Label Classics and SU!'s Wild West Alphabet to create each child's initial with Colorbox's chalk ink in Chestnut Roan . I used Fiskars Gettin' Antsy squeeze punch for the ant die cut. To finish it up I used the Crop-A-Dile to add a hole at the top of the bookmark and added some scrap ribbon.
For the girls I used a Unity Stamp Company frame from KOM 11/2010 Picture Perfect and SU!'s Wild West Alphabet to create the initials. With Recollection's Kraft cardstock and Colorbox's chalk ink in Chestnut Roan. The butterfly die cut is a Martha Stewart punch called 3-in-1 classic butterfly. To finish it up I used the Crop-A-Dile to add the hole at the top of the bookmark and some scrap ribbon.
That's all for today. Thanks for stopping by:
Yar!tza
Sunday, March 6, 2011
12x12 Nautical Theme Layout

I had this idea in my head for a while and I really wanted to document my last trip to the beach. I love the beach. It's in my heritage. I'm really going to miss not being able to go to the beach during the summers. I'll just have to make as many trips home as I can. Here is a short video walking you through the steps I took to complete it.
Supplies:
Dollar Tree: Netting and seashells
DCWV: 12x12 cardstock
Imaginisce: Splash Dance Snag em stamps, Twitterpated Mushroom Fancy paper (best linking I could do, these collections are from a year to two years ago). Glam rocks pearl.
Tulip: heat setting tool
Prima: flowers
Martha Stewart: Beach Shells Edge Punch around the page, Sand Dollar Corner Punch around the page
SU!: Jewelry Tag Punch, Tiny Tags Stamp set
Michaels: Embroidery hoop
Ranger: Glossy Accents, Distress Crackle paint Picket Fence
DecoArt: Sandstones Neutral Beige
Copic:C00, C1, C3- E25, E27, E29-V12- V15, V17- W2, W4, W6- YG11, YG13, YG15- 110 SB
atyou spica: red, sky blue
Thanks for stopping by:
Yar!tza
Saturday, March 5, 2011
Play date goodies

Breakdown and supplies:
I got these boxes from MFT stamps. It was a whole kit that included a stamp set, ribbon, brads and these favor boxes. They are no longer for sale. It was called: I want candy! mini stamp set kit. I used 3 of the boxes and ribbon that came with the kit. For the girls I used Hooga Booga stamp set. It's in the Bubble bin so I'm pretty sure that means that when they sell out they won't be carrying it. I'm not sure but if you want it go get it now. For the boy one I used Love Machine stamp set. I could not find it on the website so I believe is no longer available. All colored with copics and atyou spica pens. To die cut them I used Standard Circles Large, Classic Scalloped Circles Large, Classic Ovals Large, Classic Scalloped Ovals Large and Labels Four Nestabilities, distressed with Pumice Stone and Spun Sugar distress inks with Ki Memories Classic Prints Paper Pad.
Copic colors:
E0000, E000, EOO
R2O
RV00, RV02, RV04, RV06, RV21, RV23
Y11
YG05, YG07, YG09
YR04
atyou spica:
Pink
Silver
Thanks for stopping by:
Yar!tza
Thursday, March 3, 2011
C.C.Designs card
I love C.C. Designs images. They're super CUTE! Just received this image the other day and I just had to ink it up and color it in. LOVE her!

Breakdown and supplies:

Breakdown and supplies:
The card is cut to a standard size card (4 1/2 x 5 3/4) using Recollections gray cardstock, distressed with Pumice Stone distress ink. I used Spellbinders Nestabilities Labels Four with Cosmo Cricket's Girl Friday and Everafter stack. Distressed the patterned paper with Pumice Stone and Wild Honey distress ink. Stamped C.C.Designs Sweet November Lillian Rubber stamp with Memento Dew Drop in Tuxedo Black on some Cryogen White cardstock. Colored her in with Copics (will list the colors at the end) and added some sparkle to her atyou Spica pens. Distressed the die cut with Pumice stone distress ink, on the corner I made my own flourish using a Silhouette America cut file (accent_flourish_C20091125023039_20509 11/10/2009), Tulip heat setting tool and Tulip Glam-It-Up Iron on Crystals. The clay flowers I purchased at Michaels wedding section colored with Copics to match the colors used through the card. Used my Mini Bow Easy to create the bow using random ribbon from my stash. Random Crystals though the die cut and on her crown finishes up the card.
Copic colors:
BV20, BV23, BV25, BV29
E000, E00, E11, E25, E27, E29
R2O
atyou spica:
Brown
Black
Clear
Thanks for stopping by:
Yar!tza
Tuesday, March 1, 2011
6th Birthday party!
We celebrated my Daughter's 6th birthday party this past Saturday and fun was had by all!! I was exhausted when I got home. I fell asleep on the couch for about an hour. She was hopped up on sugar. LOL! She just wanted to head to her room and start tearing open all the gifts she received.


Thanks for stopping by:
Yar!tza

This is the table setting. They provided all the plates, napkins, cups, place mats and utensils and I made the goodie bags. Very simple. There were about 20 children and their parents there so I had to make quick and simple treats. A lunch bag filled with party favors from Walmart. I printed the journaling on the computer. It reads: Thank you for celebrating my 6th Birthday with me. Skatetown USA February 2011. Isabella Eby.
I cut the rectangles with Nestabilities Long Classic Rectangles Large and Nestablities Long Classic Scalloped Rectangles Large. On the corner I added a Littlest Pet shop sticker. It was her theme added to the theme that the skating rink provided. Folded the top over and added some curling ribbon to complete the bag.
The beautiful Birthday girl with her cake.

The birthday cake. I baked three 8 inch square cakes. Cut two about an each shorter than each other and layered them. The paw at the top was cut with my Martha Stewart Cricut cake using the Mickey and Friends cartridge. The "grass" was made with a pipping bag and a pipping tip. The fence is Wilton Fondant cut into rectangles and long strips to make it look like a fence. The flowers were also pipped. Added one of her Littlest pet shop dogs on the top. There were 24 cupcakes. The grass and flowers were pipped on. The bone was cut using a cookie cutter with fondant.
Thanks for stopping by:
Yar!tza
Subscribe to:
Posts (Atom)