Showing posts with label Recollections. Show all posts

Friday, May 10, 2013

TGF & Lifestyle Crafts Birthday Card

Hello everyone,

Today I have a card and a video to share. I made this card for my niece that's turning 7 soon. Last year I made her a card and the girl had blonde hair and she got insulted since she's got red hair. LOL! This year I made sure that I gave the girl on her card some fiery red hair.
                             
My Card
                                       

I did use Copics to color her in but I'm not an expert in Copic coloring so I didn't film that. I figured there are some real professionals out on YouTube land that will guide you better if you were looking to learn how to use them.  I'm still a true beginner. The rest of the making of the card is on the video.

Video:


 Supplies: 
Copic Colors: Hair: YR04, YR07, YR09
                       Skin: E000, E00, E11
                       Apron: BG13, BG15, BG18
                       Lace & Trim: YG03    
                       Socks & Shirt: Y13, Y15, Y17
                       Shoes: T5, T7
                       Colorless Blender
              Lawn Fawn Grand Greetings
Flower: Recollections

Don't forget use code Yaritza on Lifestyle Crafts website for an extra 20% off unlimited times. Click on the picture to the right to head over to their site.
Thanks for stopping by:
Yaritza

Tuesday, February 7, 2012

Heidi Swapp inspired mini

I've been addicted to Mycraftchannel.com's Create to Remember Channel. Heidi Swapp is the host of that one. Love it. She's got two videos that inspired this mini. Clip Frames and Back to Back Book Binding.

My Mini:


I purchased the frame at Ikea. It's called Virserum. It was only $2 and it's for 5x7 pictures. I used a bit Vintage Photo Distress ink since it was so white in comparison to the mini and wiped off the extra with a paper towel. I also distressed the mat and put a bit of scrap paper where the picture would be so when the album is removed there is still something pretty to look at. I did one change that I felt would work better for me.  Instead of hot glueing the clip on to the frame I ran a piece of Seam Binding through the frame and tied onto the clip. I could not get the clip to stay when I was playing around taking the mini in and out.  I tried not to make it too dimensional but I did add a few buttons and gems and I think that's the reason that It was so hard to take it out and put it back on without the clip de attaching from the frame.

For the album I used my Cameo to cut the pages. I used one of the files from 12x12 background frames and just sized it to fit within my frame. I used Recollection's Kraft cardstock for all my pages. Scored it in half using my Martha Stewart Scoring Board. I distressed all the edges with Vintage Photo Distress ink.  For the layering pattern paper I cut the same shape slightly smaller out of Kraft and then I layered them over the pattern paper and cut them by hand. That way I could control which way the design is facing and reserve the paper also. 90% of my pattern paper and embellishments I got from my Studio Calico kits: Handmade, Thimble, and Pin Cushion

For the cover I hand made the Rosettes using my Martha Steward scoring board and the valley and hill technique using various withs and lengths of pattern paper to achieve the different sizes. The leaves are white Prima mulberry leaves I sprayed with Olive Vine Glimmer Mist.  The photos were all edited to 2.5x2.5.

Inside Pages:


Now to pack this up and send it off to My husband's Grandma as a birthday gift.

Thanks for stopping by:
Yar!tza

Wednesday, January 18, 2012

12x12 Layout share

I completely forgot to share this layout. It's one of my favorites I've completed this year.


There are so many different layers. I hope I can explain it and make sense. For the layout I used October Afternoon's Modern Homemaker 8x8 Paper Pad. I started with a 12x12 piece of cardstock.  I cut the house from the Paper pad. Once the house was popped up I cut a 4 fences using Martha Stewarts Iron Fence deep edge punch. I trimmed the bats off and double layered them with a pop dot in between. Glued it down. Then I took some crafting moss and did a think layer going all the way across the fences and on the window planters.  Next I took 4 Petal Caps from Bottle cap Inc., punched all of our faces using Fiskars Medium Round 'n Round squeeze punch, added four 1 inch epoxy dots to the top of the photos and then adhered them in the center of the petal cap using a double layer of pop dots. I then started to layer mini roses from Recollections and Prima around them. Added some white Prima leaves through out which I stained with Tattered Angels Olive Vine Glimmer Mist. Punched a few butterflies out of the same paper pad with Martha Stewarts 3-in-1 classic butterfly punch and layered them over the flowers. For the Window planters I took lose flower petals and folded them until the resemble flower buds. For the sky I punched a few clouds out of the same paper pad with Fiskars Extra Large, Large and Medium Cloud Squeeze Punch.  The Plane is a EK Success medium punch. I tied a banner with Lemon Divine Twine. The banner itself was just created by me cutting a strip of cardstock and then making the angled cut at the end. For our last name, date and hearts coming out of the fire place I used Martha Stewarts Numbers Large Punch and Alphabet Punch Set.  That's it for that layout. WOW! That was a lot.

Thanks for stopping by:
Yar!tza

Sunday, November 20, 2011

MFT Wednesday Stamp Club Sketch 46

Hello,
I have another card I created for this week's MFT challenge. Here is the sketch:
My Card:

For this card I used Who's That E Girl. My card based was cut out of black American Crafts cardstock. I stamped the image on Copic X-Press Blending Card  with Memento Tuxedo Black ink and colored in the skin and lap top with my Copics and paper pieced the rest. For the paper piecing and layers of the card I used Cosmo Cricket's Mini Deck Circa 1934. To assemble the card I took a strip of the pattern paper and cut a banner shape at the bottom, used another pattern paper from the stack to cut the scallops using Fiskars Scallop Sentiment Punch and used the zig zag stitch of my sewing machine with black thread. Attached it to the right hand side of the card.  Cut another scallop with the punch with another coordinating pattern paper and attached some gingham ribbon and attached it going over top of the banner. Cut a strip of paper and rounded the edges using We R Memory Keepers Corner Chomper on the 1/4 inch side to create the tab, attached it to the stamped panel with the zig zag stitch and added my sentiment.  Added two Recollection's Pearls to the left side of the tab. For the flowers on the left hand corner I used two MFT dies Mini Rolled Roses and Rolled FLower to finish the flowers I added some of the Recollection's Pearls to the center. Made two bows with my Mini Bow Easy and rounded the top left side of the card with the Corner Chomper to complete the card.

Copic colors used:
E000, E00, E21, E27
N0, N2, N4, N6
Special Black 110

That's it for today.
Yar!tza

Monday, November 14, 2011

The Greeting Farm Card

Hello,
For today's card it features a The Greeting Farm image. Flapper Anya. This was a limited edition stamp released about two years ago.  Love her. One of my favorite movies is Chicago and when I saw this stamp I knew I had to have it. Then mention limited edition and I can't resist. I created this card for the current  TGF challenge over at Splitcoastamers, Customer challenge: Movie Night. We are to use TGF stamps and re create our favorite movie. A no brainer for me. I knew exactly what I was going to do when I saw the challenge.

My card:

To create this card I first cut a standard size card out of Chocolate Linen Texture Cardstock by The Paper Company. Embossed it using Tim Holtz Sizzix Texture Fade Woodgrain. Distressed the edges using Walnut Stain ink.  Stamped the image on Recollections Cream cardstock with Tuxedo Black Memento ink and colored it with Copics. This cardstock is not recommended for coloring with your Copics but I wanted the image to look vintage, stark white would be too bright and I didn't have any Copic quality cream paper on hand so I made do. It sucked up the ink like crazy. To make the hardwood floors I simply made lines going horizontally then vertically to resemble wood floors. Added some sequin trim, a feather, and some pearls around her neck to finish the image.  Cut a layer just slight smaller than my card base with the same cream paper, stamped Stampendous! Music Score wood stamp with Fired Brick Distress ink, cut the oval out using Fiskars Shape Templates Ovals and Ultra Shape Express. Then used Heidi Swap's Edge Distresser around the outside of the layer and in the oval cut out. Distressed using Vintage Photo and Walnut Stain Distress inks. Curled two of my edges in and added the image behind. The title was cut using my Silhouette with LD Candid Font out of some scrap red and black cardstock and added Christmas Red Stickles for some sparkle. To finish off the card I added some Recollection's mini roses, a feather and some more of the sequin trim.

Copic colors:
E0000, E000, E00, E25, E27, E29
R20, R24, R27, R29
100 Black
Colorless Blender

Thanks for stopping by:
Yar!tza

Saturday, July 30, 2011

Papertrey ink cards.

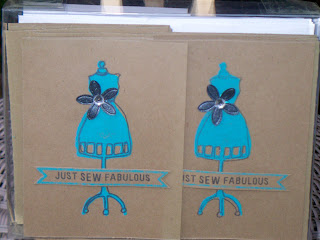
Still practicing making easy cards to mail off.  I really loved the way these two came out.  I used a lot of Papertrey ink goodness.


Supplies:
Papertrey ink: Mehndi Medallion, Buttoned up #2 die, Dress From stamp set
Provo Craft: Cuttlebug embossing folder Seeing Spots
Core'dinations: Cardmaker Series Pearls Tan Pearl
Tsukineko: Memento Dew drop Rhubarb Stalk
May Arts: 1/4 inch silk ribbon SK25


Supplies:
Papertrey ink: Dress Form stamp set, Dress Form Die, Double-Ended Banner die, Parisian Lace Doily, Buttoned up #2 Die &Vintage Cream Pigment Ink
Recollections: Kraft Cardstock, Pearls
Core'dinations: Cardmaker series Pearls Tan pearl
Misc. Embroidery Floss & Wood paper

That's all I have for today. Thanks for stopping by:
Yar!tza

Saturday, July 23, 2011

Lawn Fawn card

I've been loving Lawn Fawn images. If you can't tell the last four cards have featured their stamps. Here is another attempt at making simple card.  I almost made it then I decided it needed some bling. I found those tiny tiny pearls at Michaels. They're by Recollections and they fit perfectly inside of the keys.  It was like it was meant to be.  How can I pass that up.


Supplies:
Recollections: Kraft cardstock & Pearls
Lawn Fawn: Just my Type
Tsukineko: Memento Dew Drop Tuxedo Black
Prismacolor: Aquamarine PC905
Loew-Cornell: Better Way Brush Cleaning Fluid

Thanks for stopping by:
Yar!tza

Thursday, July 21, 2011

Missing in action plus card share

Yeah so I've been absent from the blog for a month. To start things off my niece and nephew are here to visit for the whole summer, so it's been me and 4 kids all 6 yrs. old and under by myself since hubby was at school for the first three weeks.  Man you really learn how to manage your time better.  Also, I'm trying out for a few design teams. First time ever trying out so I'm not holding my breath. But I really wanted to challenge myself and do something that scares me. I'm a pretty shy, non confrontational person so this is really out of my element. I've been creating, just not things that I can put up on the blog yet.  I have made a heck of a lot of cards these last few days, though.  I've been all about challenging myself lately and I really wanted to try and make simpler cards that will mail easily.  I find myself paying a lot of money is postage when I have to mail out a card to a friend or family member. That really does not bother me but when I gift cards in packages I want to make sure that the recipient does not have to pay a lot in postage.  The first card did not meet my challenge requirements but I think by the time I got to the last card I succeeded. Here are just a few of the cards I've worked on as of late.


This is the first card. It started out good and then I gave in.  It just felt too plain and I though a felt flower would do the trick.


Supplies:
Lawn Fawn: Fanciful Frames & Just my Type, too
MFT die namics: Rolled Flower
Prima: White Mulberry leaves
Tsuikineko: VersaMark
American Crafts: Zing embossing powder Chestnut
Core'dinations: Cardmaker Series Pearls Baby pink pearl
Martha Stewart: Score Board
Papertrey ink: Dark Chocolate Felt
Copic: YG63
Misc. Pearl and wood paper


Then I figured, well the first one has dimension, Why not?


Supplies:
Tsukineko: VersaMark
Darice: Self-Stick Chalkboard Sheets
Misc: Pearls 

Than I decided to cut it out and really try. Not as happy with this one. It just looks so unfinished. Maybe if I added a little bit of pattern paper it wouldn't look so bad.


Supplies:
Recollections: Kraft cardstock
We r Memory Keepers: Corner Chomper round 1/2 inch


Thanks so much for stopping by and I hope that within a few weeks I can start keeping on with my blog on a more daily version.  
Yar!tza

Tuesday, May 31, 2011

Last day of Kindergarten teacher's gift

Hello,
I completed another fast motion project, this time I walk you through how I completed this card gift set for my daughter's teacher.
Box
Cards
Video

Supplies:
Lifestyle crafts: Folder with insert
Unity Stamp CO.: Ipitty Books A' Flutter
Spellbinders: Labels one
Ranger: Distress ink (Wild Honey, Fired Brick, Pumice Stone, Broken China, Old Paper, Spun Sugar and Peeled Paint), Matte Accents
Recollections: Mini roses, Kraft cardstock, Cream cardstock
Pentel: RSVP Pens
Misc. Ribbon


Thursday, May 5, 2011

Mother's day card 2011

In my hurry to get these in the mail I totally forgot to take a picture of them.  I did slow the video down at the end so you can see it as good as possible.

Video:


Supplies used:
Lawn Fawn: Say Cheese
Stamping Bella: Morning Glories for LuLu
Ranger: Vintage photo Distress ink, Ink Blending tool, Perfect Pearls Pearl 
Sizzix: Tim Holtz Alterations Tattered Banners
3M: Pink ATG gun
Recollections: Kraft Cardstock and Mini Round Gems
Core'dinations: Cardmaker Series Pearls Lavander Pearls
Cardstock: Cryogen White 89#
Copic colors:V12, V15, V17, G82, G85, C1, 110 Special Black, Colorless Blender
Spika: Lavander
Hug Snug: White Seam Binding
Studio G: Happy Mother's day stamp
Tsukineko: Memento Dew Drop Tuxedo Black, Versamark
Spellbinders: Classic Squares Large
Martha Stewart: Pink Bone Folder

Friday, April 15, 2011

Easter Treats 2011

Hello,
I made my daughter some treats to take to class and I wanted to show you guys how I got them done so I made a quick video walking you through all the steps.  These could be made for any occasion not just Easter and you can customize the size of the bags and the size of the topper how ever you wish.  This is  just my take on it.


Treats
Video


Supplies:
Spellbinders: Nestabilites Labels 4
Tim Holtz: Tiny Attacher
Pink Cat Studio: Background Plate #5 Farm
Stamping Bella: Happy Easter Stamp
Michaels: Recollections Kraft Cardstock and Pink and Yellow Chicks
Making Memories: Pets 12x12 Dog Solid Cran Cardstock
Misc. Moss, 1x8 treat bags 

Thanks for stopping by:
Yar!tza


Sunday, April 10, 2011

Mom's Love 12x12 Layout featuring Pink Paislee

Hello everyone,
Today I have a video to share with you.  I filmed myself making this whole layout.  It will be played in fast motion. It's the first time editing a video like this so I hope it looks good.  My husband even did the music for it in Garage Band. He did so good.
Layout: 

Video:

Supplies used:
Pink Paisley: Daily Junque Wood Alphabet, Butterfly Garden 6x6 paper pack, Butterfly Collection Wooden Shapes and Artisan Elements Circles
Heidi Swapp: Invisibles Lovely Grid and Edge Distresser
Making Memories: Scrapbook Colors Cornflower, Tag Maker kit and Slice Tagmaker Rims Tag
Ranger: Alcohol Ink Fillable Pen with Stream Alcohol ink, Distress stains in Antique lien, Spun Sugar and Walnut Stain, Distress ink in Peeled Paint and Vintage Photo
Tim Holtz: Texture Hammer
Provo Craft: Ornamental Iron Cricut Cartridge, GypsyCricut Expression and Cuttlebug
Prima: Mulberry White leaves
Recollections: Boutique Fleur Floral Embellishments and Mini paper Roses
May Arts: Leaves Ribbon
Spellbinders: Nestabilities Labels Four
Queen & Co.: Grass Green Pearls
Deco Art: Weathered Wood Crackling Medium
Xyron: 9" Creative Station 
Tattered Angels: Olive Vine Glimmer Mist
3m: ATG Gun 
We R Memory Keepers: Corner Chomper
Misc.: Velvet Ribbon, Clay flowers and hot glue gun

Sunday, March 13, 2011

Card Gift Box

Hello everyone,
I find myself struggling to come up with gift when I need them. So I decided that I'm going to start making a few at a time to keep on hand for when I need them.

Here is my finished project:


 In the video I will show you how I created the cards and walk you though the completed gift box.


Supplies:
Claudine Hellmuth: Creative Layers Domestic stamp set
Sizzix: Bigz Pro shot Box and Lid die set
Papertrey Ink: Double-Ended Banner die & Banner Builder Stamp
Hero Arts: Sew Stylish Stamp
Unity Stamp Co: Material Girl Stamp
Stamping Bella: Sew What's new?
Clearsnap: Colorbox Fluid Chalk Inkpad Charcoal
Anita's Craft Ink: Island Green
Prima: Lace
Marta Stewart: Scoring board & Cornice Edge Punch
Michaels: Studio 18 Gems, Misc. Feather & Recollections Kraft Cardstock
Brides Confetti: Silver Flower table Confetti

Provo Craft: Terrifically Tacky Tape Sheets
Scor Pal: Scor Tape 1/4 inch wide
3M: Pink ATG
Tattered Angels: Dazzling Diamonds
Grafix: 12x12 .007 plastic sheets
Joanns.com: A2 Envelopes 

Thanks for stopping by:
Yar!tza

Wednesday, March 9, 2011

Card to share

I've had this idea in my head for such a long time. I was obsessed with it when I saw all these stamps and cricut cartridge. Saved my pennies and I was able to get all the supplies together to make this one card. Yes one card!! I had to make this one card!

Here is the inside of it: I had to color in the image and then figure out the dimensions of the card based on the final size of the image. Honestly I don't even remember what the final dimension of the card is. I though I had it all figured out and then I had to start over cause I was an inch off.  A whole inch.  Math has never been my strong subject.


Breakdown and supplies:
Fist I stamped C.C.Designs Sweet November Lilliane stamp with Memento Dew Drop Tuxedo Black ink. Covered her with a stamped mask made out of Inkadinkado's stamping mask paper.  Used my Stamp-a-ma-jig to help me line up Magnolia's Castle background stamp.  Colored the whole scenery with my Copics and highlighted certain areas with my atyou spica pens all of that done on Cryogen white cardstock. I distressed the edges with Pumice Stone and Vintage Paper distress ink. Cut panels out of Graphic 45 Steampunk Debutante 8x8 paper pad to cover the flaps on both sides.  On each panel I took the biggest rose and covered it with Rock Candy Distress Stickles.

Here is the front:


Breakdown and supplies:
I cut two panels out of the B side of the same patterned paper I used for the inside of the card. Used my Cricut Expression and the Ornamental Iron cartridge to cut the two gates out of  DCWV The Metallic Stack.  I used May Arts 1 1/2 inch silk ribbon which I cut in half and then colored with my Copics to match. I attached the ribbon with 1/4 inch Scor tape to the card base all the way around so the ribbon would not fall off when opened.  On the corner I die cut two small gears using Tim Holtz's Sizzix Bigz die Gadget Gears with black mat board and some left overs of the patterned paper, sprayed with Dazzling Diamonds Glimmer mist. Some Recollection's Mini Roses that were toned with Copics to match and sprayed with Dazzling Diamond Glimmer Mist, two white Prima leaves sprayed with Olive Vine Glimmer Mist and some Recollections bling finish off the card.

Copic colors:
B21
BG13, BG15, BG18
C00
E000, E00, E11, E25, E27, E95, E97, E99
G94, G99
T1, T3, T5, T7
R2O
YR05, YR07, YR09
Colorless Blender
atyou spica:
Orange
Turquoise
Silver
Multilner .05

That's it for today. Thanks for stopping by :
Yar!tza

Tuesday, March 8, 2011

Bookmarks


I made these a few weeks back to take to my daughter's class mates on her birthday. Her school is a  no food school but the teacher likes for the parents to come to the class and read the class a book (even though I didn't get to read the book, Isabella read it all by herself) I still wanted to have a little something for the kids.

Breakdown and supplies:
This is a great project to use up all those scraps you have laying around.
You'll need some sort of hear laminating machine.  I used my Provo Craft Yourstory with Scotch's Thermal Laminating Purches for Business I.D. Cards.
For the boys I used Recollection's Kraft cardstock, a frame stamp from SU!'s Label Classics and SU!'s Wild West Alphabet to create each child's initial with Colorbox's chalk ink in Chestnut Roan .  I used Fiskars Gettin' Antsy squeeze punch for the ant die cut. To finish it up I used the Crop-A-Dile to add a hole at the top of the bookmark and added some scrap ribbon.
For the girls I used a Unity Stamp Company frame from KOM 11/2010 Picture Perfect and SU!'s Wild West Alphabet to create the initials. With Recollection's Kraft cardstock and Colorbox's chalk ink in Chestnut Roan. The butterfly die cut is a Martha Stewart punch called 3-in-1 classic butterfly. To finish it up I used the Crop-A-Dile to add the hole at the top of the bookmark and some scrap ribbon.

That's all for today. Thanks for stopping by:
Yar!tza

Thursday, March 3, 2011

C.C.Designs card

I love C.C. Designs images. They're super CUTE!  Just received this image the other day and I just had to ink it up and color it in.  LOVE her!


Breakdown and supplies:
The card is cut to a standard size card (4 1/2 x 5 3/4) using Recollections gray cardstock, distressed with Pumice Stone distress ink.  I used Spellbinders Nestabilities Labels Four with Cosmo Cricket's Girl Friday and Everafter stack. Distressed the patterned paper with Pumice Stone and Wild Honey distress ink. Stamped C.C.Designs Sweet November Lillian Rubber stamp with Memento Dew Drop in Tuxedo Black on some  Cryogen White cardstock.  Colored her in with Copics (will list the colors at the end) and added some sparkle to her atyou Spica pens. Distressed the die cut with Pumice stone distress ink, on the corner I made my own flourish using a Silhouette America cut file (accent_flourish_C20091125023039_20509 11/10/2009), Tulip heat setting tool and Tulip Glam-It-Up Iron on Crystals.  The clay flowers I purchased at Michaels wedding section colored with Copics to match the colors used through the card. Used my Mini Bow Easy to create the bow using random ribbon from my stash. Random Crystals though the  die cut and on her crown finishes up the card.

Copic colors:
BV20, BV23, BV25, BV29
E000, E00, E11, E25, E27, E29
R2O
atyou spica:
Brown
Black
Clear

Thanks for stopping by:
Yar!tza

Monday, January 31, 2011

Unity card

Hello Everyone,
I have a card to share with you today. This features two stamps from Unity Stamp Company KOM Nov. 2010 Picture Perfect. I'm a new recent subscriber to their monthly kits and I love them.  This kit is what got me hooked. Once I saw this couch and frame collage I knew I had to have it.  

Breakdown and supplies:
First I cut the piece of pattern paper from October Afternoon's The Thrift Shop called Needs Paint. Stamped the frames from the Unity kit with ColorBox's Chestnut Roan Chalk ink. Added some small Prima flowers and pearls from Imaginisce Glam Rocks Pearls attached with my Tulip Heat setting tool. The small birds were images I had seen on the web and asked this company, Imagine Stamps, to make them for me out of clear stamps. Then took the back side of the patterned paper and used Fiskars Apron Lace Border punch to add a decorative edge. Wrapped some white May Arts Silk ribbon distressed with Vintage Photo Distressing Ink. Some Prima flowers, a custom made pin using a Heidi Grace pin from the Woodland collection and some embroidery floss. I stamped the couch using the back side of the patterned paper and cut it out.  Popped it up using pop dots.  It all got attached to a standard size card using Recollection's Kraft paper

That's it for today. Thanks for stopping by:
Yar!tza

Thursday, January 27, 2011

A manly card

I'm still trying to get a hold of how to make manly/boyish anything.  I'm pretty bad at it.  This is an attempt at a Birthday card.  I thought it wasn't bad.  I need sentiments that are more squarish of sorts. Nothing too swirly or pretty but these were the best sentiments I had that were manly.


The breakdown and supplies:

First I stamped Printworks Collection Dad's truck stamp on some Papertrey ink's Stamper's select white cardstock. Colored with my Copics (I'll list the colors at the end).  I stamped the sentiment "celebrate" from Inque Boutique's Mini Birthday stamps set ( I think they went out of business), using my EKSucess Stamp-a-ma-jig stamp positioner to make sure that the sentiment ends up in the center of the license plate area with Memento Dew Drop in Tuxedo Black ink. I cut the image out using my EKSucess Precision Snips Scissors. Those things are amazing for cutting out all those tiny details. Love them! I used my retired SU! My ABC wheel stamp (it looked like a road to me) with the Stampin' around handle that had an un-Inked stamping around cartridge  re-filled with VersaMark and embossed with Stampendous! Stamp-n Stuff Embossing Powder in Detail Black Opaque on Papertrey Inks Stamper's select white cardstock and distressed with Pumice Stone distress ink. The background paper is from Cloud 9 Designs Wild Indigo Specialty 12x12 Paper pad, I distressed the edges with Heidi Swapp's Edge Distresser. With American Crafts Ginger Alphabet stamp set I created the sentiment "beep!" using Memento Dew Drop in Tuxedo Black ink.  For the card base I used Recollection's Kraft cardstock, put on the "road" flat on the card and popped the car up with some pop dots. 

Copic colors:
C00
BG 93, BG 96, BG 99
Y11
Colorless blender

That's it for today. Thanks for stopping by:
Yar!tza

Wednesday, January 26, 2011

Valentina


Just another card share.  This is using Green Bean Baby stamps by Ellia called Valentina. Isn't she just the cutest!


Break down and supplies:

 First I stamped Green Bean Baby stamps by Ellia called Valentina on some Papertrey Ink's Stamper's Select  White Cardstock  with Momento Dew Drop Tuxedo Black.  Colored her in using my Copics and atyou Spika pens (I'll post the colors at the end).  Once she was all colored and looking pretty I cut her out using my Spellbinders Nestabilities Standard Circles Large.  I took some KolorFast Brown Crepe Streamer and made a frame around the circle. Then using my Fiskars fabric scalloped shears I cut scallops on the streamer. Added some some scrap ribbon, some Recollections bling (that's the Michaels brand) and some white paper roses I got from Favorpro colored with my Copics to  match. Layered all on top of Recollections white cardstock, I believe. Have had it for a while. Don't remember where it came from.

Copic colors:
C1
E0000, E000, E00, E21, E25, E27, E29
R20, R21, R22, R24
atyou Spika Red

That's it for today. Thanks for stopping by:
Yar!tza

Saturday, January 22, 2011

My baby girl

I had taken my daughter with me to get my son's pictures taken when he was 9 months old. Well she can't help herself she always loved to have her picture taken and they took this shot of her.  It was my absolute favorite.  She was dancing! It truly does capture her fun spirit.  


The breakdown and supplies:
 I took a piece of 12x12 paper from My Minds Eye Life Stories collection 2.  I Die cut a frame with Sizzix's Frame, ornate #3 with a piece of Core'dinations Core Couture paper in Elegance.  Took the frame and ran it through the Cuttlebug using the Swiss Dots Embossing Folder. Took my Making Memories sanding block and went over the top gently so that the dots would pop a little more. I had a piece of left over transparency so I cut the center oval out of that to be able to cut the picture to fit within the frame. Well I liked the way it looked. Made it look like a picture frame so I left it on the picture.  Popped the whole thing up with pop dots.  I added a strand of Prima Bling ( I purchased it a while ago at Michaels). On top of the bling I added a Recollections Boutique Fleur (It's the Michaels line of scrapbooking supplies). Through out the vine I also added some Prima Mini Roses and Recollections Mini Roses. Cut a few Butterflies with Martha Stewart 3 in 1 classic butterfly punch with some of the Core'dinations Core Couture paper in Elegance.  On the right hand side of the layout I used Papertrey Inks Dies to match Banner Builder Collection to cut the two rows of banners with Core'dinations Core Couture paper in Elegance for the bottom layer banner and some brown scrap cardstock for the top layer banner. Stitched some ribbon from Making Memories Vintage Findings Trim.  Added some more of the Recollections Mini Roses and Prima Mini Roses and some of the Martha Stewart 3 in 1 Classic butterfly punch to complete the layout.


That's it for today. Thanks for stopping by:
Yar!tza